Workaround for Java 8u131 “attempted to open sandboxed jar xxxxx as a Trusted-Library” error

A recent Java update to Java 8 build 131 changed what Java would accept as a “signed” JAR app. Specifically, any JAR signed with an MD5 hash will no longer be considered trusted, as the MD5 hash is now considered to be weak.

This change results in applications refusing to run with an error message like:
preloader: Delivering: ErrorEvent[url=https://XXXXX label=attempted to open sandboxed jar https://XXXXX/.jar as a Trusted-Library cause=attempted to open sandboxed jar https://XXXXX/.jar as a Trusted-Library

This occurs when the site delivering the applet is signing it with an MD5 hash. I’ve seen reports of the PulseSecure PCS and Cisco ASA doing this with the HOBsoft HOBlink Java RDP client, meaning that users are unable to securely access systems behind these devices.

PulseSecure have a workaround for their PCS –https://kb.pulsesecure.net/articles/Pulse_Secure_Article/KB40580.

Cisco do not currently have a solution.

The simplest workarounds are:
a) downgrade to an earlier release of Java, or
b) re-enable MD5 hash as an acceptable cipher.

Here’s how to do the latter on Windows and macOS (OS X). It involves editing the “java.security” config file which the Java Virtual Machine uses.

Windows (tested on Windows 10)

You will need local administrator access for this.
Close browsers and any Java apps

Open CMD as Administrator

cd "C:\Program Files (x86)\Java\jre1.8.0_131\lib\security"
notepad java.security

(The path may be C:\Program Files\Java\jre1.8.0_131\lib\security if you run the 64-bit Java)

Current Line:

jdk.jar.disabledAlgorithms=MD2, MD5,  RSA keySize < 1024

Change this to:

jdk.jar.disabledAlgorithms=MD2,  RSA keySize < 1024

(i.e. remove the “MD5,”)

Save the file

macOS Sierra (Mac OSX)

cd /Library/Internet\ Plug-Ins/JavaAppletPlugin.plugin/Contents/Home/lib/security
sudo vi java.security

Enter your password at the prompt so that you can edit the protected file.
Type “/jdk.jar.disabledAlg” to find the relevant line.

Current Line:

jdk.jar.disabledAlgorithms=MD2, MD5,  RSA keySize < 1024

Change this to:

jdk.jar.disabledAlgorithms=MD2,  RSA keySize < 1024

(i.e. remove the “MD5,” – use the cursor keys to move to the “MD5,” and press “x” to delete each character)
Save the file by holding down SHIFT and pressing “Z” twice.

Caveat: This workaround is disabling a security measure within Java, so should be considered a risk. However, the risk is only the same as the previous version of Java, and I would assume vendors will eventually update their systems so that they sign Java applets in a secure fashion.

This works with later versions of Java as well. I’ve tried it up to Java 8 Build 161. You do have to repeat the change after each upgrade though as it restores the MD5 text.

Adding a static route on VCSA 6.5

I recently upgraded my lab vCenter to the vCenter Server Appliance (VCSA) v6.5.

As I need a static route on my network, I went to add that in the same way that I’ve done for other VCSAs, only to find that the networking has changed.

VCSA 6.5 now uses systemd-networkd to control networking. Any attempt to use “service network restart” will generate a bunch of error messages about “exiting with error 6”. Editing files in /etc/sysconfig/network  will have no discernable effect.

So how do you add a static route under the new networking regime?

Log on to your VCSA using ssh (or the console) and start a shell.

cd /etc/systemd/network

There you will find all the network config files.

Typically you will have just one, named “10-eth0.network”.

The contents of this file are relatively self explanatory:

[Match]
Name=eth0
 
[Network]
Gateway=192.168.1.254
Address=192.168.1.40/24
DHCP=no
 
[DHCP]
UseDNS=false

Add a new section at the bottom of the file using your favourite text editor:

[Route]
Gateway=192.168.1.20
Destination=192.168.2.0/24

Again, the format for this is pretty obvious.
Once that’s saved, run:

systemctl restart systemd-networkd

Check that your route has taken using

root@vc01 [ ~ ]# ip route show
default via 192.168.1.254 dev eth0  proto static
192.168.1.0/24 dev eth0  proto kernel  scope link  src 192.168.1.40
192.168.2.0/24 via 192.168.1.20 dev eth0  proto static

Oracle Secure Global Desktop (SGD) fails on MacOS Sierra

I’ve recently been struggling to get the Oracle SGD desktop client working on macOS Sierra (10.12.3, specifically).

I’d installed Java, Firefox and XQuartz but kept getting a Java error saying “Failed to install SGD client”.

Here’s what I found I needed:

  • Java – because it’s a Java app
  • Mozilla Firefox – easiest way to run Java web apps on a Mac
  • XQuartz – the open source replacement for the Apple X11.app which used to be included with OS X.
  • The Oracle SGD Desktop client, usually available from the logon page for your SGD service.

If you have XQuartz 2.7.10 or later you will also need to run the following commands in Terminal:

sudo mv /opt/X11/lib/libXt.6.dylib{,.bak}
sudo cp /opt/X11/lib{/flat_namespace,}/libXt.6.dylib

My thanks to this Harris Geospatial web page for pointing me in the direction for that fix.

Some people may find it necessary to move the “Oracle Secure Global Desktop Client” from the main /Applications folder to your local user ~/Applications folder.


VMware ESXi 6.0 Update 2 – Host Client “Service Unavailable” error

I’ve recently upgraded my home lab ESXi hosts to ESXi 6.0 Update 2 (6.0u2).

One of the features added is the VMware Host Client – an HTML5 standalone web interface for managing an ESXi host. This has been available as a VMware Labs “Fling” for a while but it’s now part of the default installation. It allows you to manage a standalone ESXi server without needing vCenter or the Windows-only vSphere Client (aka the C# client).

ESXi Host Client screenshot

When I tried to access the new client (https://[yourhost-ip-or-name]/ui/) , I was faced with an error:

503 Service Unavailable (Failed to connect to endpoint: [N7Vmacore4Http16LocalServiceSpecE:0x1f0a2c70] _serverNamespace = /ui _isRedirect = false _port = 8308)

A bit of web searching brought me to a blog article by the ever-comprehensive William Lam about an issue with the original Fling when installing on a host which has been upgraded from ESXi 5.5 or earlier.

Part of the Reverse HTTP Proxy config does not get updated during the upgrade, leaving the new UI broken.

The fix is:

  1. Log on to your ESXi host (either via SSH or DCUI/ESXi Shell)
  2. Edit /etc/vmware/rhttpproxy/endpoints.conf
  3. Remove the line:
    /ui    local    8308    redirect    allow
  4. Now restart the rhttpproxy:
    /etc/init.d/rhttpproxy restart
  5. You should now be able to access the Host Client at https://[yourhost-ip-or-name]/ui/

ESXi Host Client login

Cisco WebEx stuck at 98% when joining meeting using Mac client

I recently hit a problem on my MacBook Air when trying to use Cisco WebEx. The Mac is running OS X 10.11 El Capitan.

The WebEx client installed without an issue, but when I tried to join a meeting the connection would hang at 98%. I had to use Force Quit to kill the client.

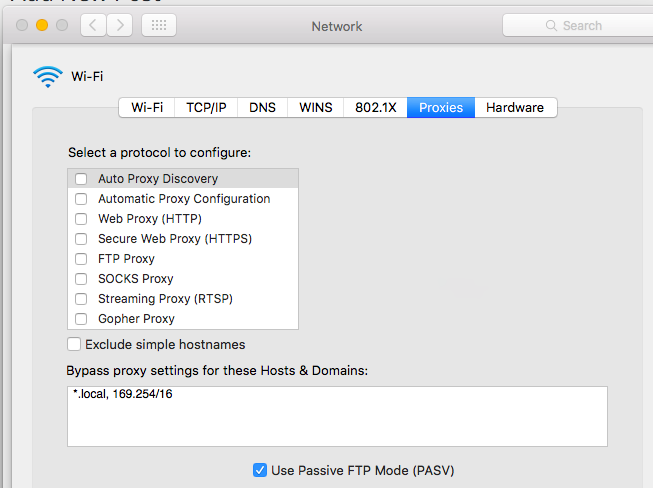
The solution to the problem was to change the proxy settings in Network Preferences. I’m not using a proxy but WebEx seems to have difficulties with the default setting.

Open “System Preferences” then select the “Network” icon.

Now select your current network connection from the left-hand panel (in my case this was Wi-Fi). Click the “Advanced…” button on the lower right of the panel.

Click the “Proxies” tab and the proxy settings are on the left. I’m not using a proxy but the default setting is “Auto Proxy Discovery”. Untick that, click “OK” and then “Apply” and WebEx would connect without any further problem.

System PreferencesScreenSnapz001

VMware Distributed Virtual Switches with single-NIC hosts

Home Lab

I have a small Home Lab for vSphere, based on two Intel NUC hosts running ESXi and an HP Microserver running FreeNAS, presenting datastores as iSCSI LUNs to the hosts.

The vCenter is a vCenter Server Appliance (VCSA) running on one of the ESXi hosts.

The initial setup was fairly straightforward and you can find plenty of other people who have done similar things.

The Problem

One of the difficulties/limitations of using the Intel NUC is that each machine has a singe NIC. That makes creating a Distributed Virtual Switch (DvS) quite difficult as when migrating the host running vCenter to the DvS, the vCenter loses contact with the host and rolls back the migration.

I figured I could live with standard switches, and if I really needed to use DvS I could use nested ESXi with multiple virtual NICs.

A Workaround

Recently I discovered an excellent blog article by Larus Hjartarson titled “vCenter & Distributed vSwitch on two ESXi hosts with a single NIC“. This suggests a workaround for the migration issue mentioned above.

The outline of the workaround is:

  1. Create the DvS on the host that doesn’t run vCenter.
  2. Move that ESXi host  to the Distributed vSwitch. Create VM traffic portgroups.
  3. Clone the vCenter VM and place it on the ESXi host that doesn’t run the vCenter VM.
  4. Connect the newly cloned vCenter VM to a Distributed Portgroup on the ESXi host (that was connected to the DVS previously)
  5. Turn off the original vCenter.
  6. Turn on the cloned vCenter and configure the network settings
  7. Move the other host to the Distributed switch.

Some things I encountered which might help others attempting this:

VCSA changes MAC address when cloned

If you’re using the VCSA for your vCenter, when you clone it the MAC address changes so it won’t come up properly. There’s a VMware KB article on how to work around that:
http://kb.vmware.com/kb/2012451 – basically you edit the /etc/udev/rules.d/70-persistent-net.rules file so that the new MAC address is associated with eth0.

iSCSI vmknics cannot be migrated

If you’re using iSCSI-based storage, you cannot migrate a host to the DvS until you remove the vmknic from the software iSCSI adapter, which means having no iSCSI-stored VMs running on the host at the time.

You can’t vMotion the VMs to the other host as they’re on a standard vSwitch and the other host is on a DvS. Even if you leave the old standard vSwitch in place on the other host, vMotion will still abort as it sees the old portgroup as a “virtual intranet” (i.e. no uplinks). So you have to shut down the VMs to move them. That’s when it becomes important to either have two DNS servers, DNS served outside your VMware setup or your host names in the vCenter hosts file.

VMware do have an KnowledgeBase article on the “virtual intranet” problem which has a workaround based on editing the vCenter config file but I have not tried that.

I hope that information proves useful to anyone else using single-NIC hosts for a Home Lab.  Obviously I wouldn’t recommend doing any of this on a production environment, but then I’d hope that a production environment wouldn’t be using single-NIC hosts anyway!

VMware Workstation: Cannot open VMparport driver for LPTx

Recently came across a problem when trying to access a parallel port dongle from a Workstation machine.

The VM was configured with a virtual parallel port, and the host machine had a PCI parallel port card installed which was recognised by the host OS (Windows 7 in this case).

Every time the VM was started, Workstation threw an error along the lines of:

Cannot open VMparport driver for LPT3:
Failed to connect virtual device parallel0

After looking round the VMware Communities for a while, I found the solution.

The PCI Parallel Port card was installed after VMware Workstation. During the Workstation installation process, the installer looks to see whether the host has a parallel port, and if it does it installs a driver allowing VMs to access the port. If there’s no parallel port, the driver doesn’t get installed.

The problem here is that if you add a parallel port afterwards, there’s no virtualisation driver for it, resulting in the error above.

The solution is to uninstall and reinstall VMware Workstation after the hardware change. Reinstalling doesn’t affect any settings or VMs as long as you tell the uninstall process not to delete anything.

This probably applies for VMware Server and Player too.

PowerCLI: Counting physical CPUs in a vSphere Host

We recently needed to calculate the number of physical CPUs in use by hosts running Windows VMs in order to work out how many Windows Server 2008 Data Center Edition licenses we require.

Data Center (DC) edition permits you to run as many Windows Server VMs as you like on a host which has the DC license. You don’t actually need to install the Datacenter software, so you can use this license on a host running vSphere or Xen (as well as Hyper-V).

Not all of our hosts need a DC license as some don’t run any Windows VMs, and other run a smaller number where it’s cheaper either to use an Enterprise license (up to 4 VMs) or license VMs individually. To mark which hosts need a DC license, I create a Custom Attribute called “DC SPLA” for all hosts, with values of “Yes”,”No”, or “?” (where it wasn’t clear what license was appropriate).

I then created a small PowerCLI script which dumps out a CSV file containing all hosts which were possible DC license uses (those which were marked “Yes” or “?”), along with the number of physical CPUs in each host.

It’s a short script and isn’t particularly special but I’m posting it anyway.

  1. $vcentername = "myvcentername.net"
  2. $outputfile = "c:\users\myname\Desktop\cpucount.csv"
  3.  
  4. Connect-VIServer $vcentername
  5.  
  6. get-vmhost | ForEach-Object { 
  7.  if ((Get-annotation -Entity $_ -CustomAttribute "DC SPLA" | select -ExpandProperty value ) -ne "No")
  8.  {
  9.  New-Object -TypeName PSobject -Property @{
  10.   HostName = $_.name 
  11.   CpuCount = (Get-View $_.ID).Hardware.CpuInfo.NumCpuPackages
  12.   	}| Select-Object Hostname,CpuCount
  13.  }
  14. } | export-csv -Path $outputfile 
  15.  
  16. Disconnect-VIServer $vcentername -Confirm:$false

Converting a “Big Board”: vBulletin to xenForo Migration

Migrating what?

First a bit about the urban75 boards. Based in Brixton, London, UK, urban75 is one of the busiest, non-profit community sites around, featuring huge photography sections, bulletin boards, live chat, drug information, football, direct action info and more. The boards are entirely non-profit and carry no advertising. The site is primarily funded by donations from board users (there are no subscriptions).

As a result, we’re not running on particularly flashy hardware, upgrading the server using spare equipment our hosting provider has available.

vBulletin Days and Nightmares

We have been running vBulletin for almost a decade and it served us well for much of that time.

In August 2010 we upgraded to vBulletin 4. That upgrade was, frankly, a nightmare.

I spent many, many hours trying to optimise the database, tracing slow queries and following bug reports. I also ended up installing Sphinx search, even though vBulletin seemed very slow at handling the results it got back from Sphinx. At first there were many complaints, some about things which we could fix, and others about things which eventually people just got used to.

xenForo is announced

When xenForo was announced, several of the moderators on the boards went over to the community on xenforo.com and were impressed by what they saw.

I speculatively purchased a xenForo license when they first became available, thinking I could use it myself even if it turned out to be unsuitable for Urban75.

Following the purchase of the license, I installed a test copy on our little test server, and invited the moderators over for a look.

I think it’s fair to say everyone was blown away by the functionality and there was soon a consensus that we should look to move the main Urban75 boards to xenForo.

Testing Times

We weren’t going to go live with a pre-1.0 version so we waited. We invited a number of users over from the main boards to take a look at xenForo and feedback their thoughts. That lasted a couple of weeks with lots of positive feedback. When 1.0 was released I started further investigations into the migration, checking what functionality was missing and what add-ons would be useful.

Using Paul M’s vBulletin 4 Importer  I ran through an import from a year-old backup of the main boards, importing around 9 million posts without a hitch. On our test server the import took just over 24 hours.

There was no way I was going to use the xenForo built-in search on that size of message base so I installed the Sphinx executable and mlx’s Sphinx Search Engine add-on, followed by a few hours configuring and indexing using Sphinx. Running some test searches showed results from the xenForo boards on the test server coming back much faster than they did on the vBulletin live server. Both were using Sphinx so that indicated something seriously bad was going on with vBulletin displaying search results.

I tried a few other extras, including Darkimmortal’s vB4 URL Redirection add-on, the Tapatalk and ForumRunner mobile add-ons, and the Stop Forum Spam and Multiple Account Detector add-ons.

Preparing for the Migration

Work got in the way of planning a full migration for a while, but eventually I put a stake in the ground, choosing the weekend of the anniversary of our vBulletin 4 upgrade. With the help of other moderators, we got a couple of styles sorted out, one very similar to the default xenForo style and another variation without avatars which had been a particular request.

In preparation, I installed the xenForo software on the live server under a different directory from the existing vBulletin, and did some of the config under a single Administrator user.

Here We Go!

The actual night of the migration arrived and I closed the vBulletin site at 23:59 on 5th August 2011. We have a small phpBB installation which we open for times when the main boards are down and I put a link to that on the “Site Closed” message.

First things first, a full MySQL dump of the vBulletin database and the embryonic xenForo database, just in case.

Then the first step of the migration, using the latest version of the vBulletin 4 importer.

The user importer fell over quite quickly, complaining about “Duplicate entry for key 2” for a user named “Ęllie”. Scratched by head for a few minutes before gently renaming the user and re-starting the import. A few minutes later I hit another user with the same issue, this time called “‘Mått”. Same fix for that one and the rest of the users imported fine.

I started the largest part of the import, copying the Threads and Posts at 01:55 on Saturday morning. By 02:30 it was obvious this was going to be a very long job so I went to bed hoping that the import might speed up while I was asleep. Rising at 06:30 I found that it hadn’t got any faster and that my original estimate of a much faster import on the live system was sadly wrong.

With me monitoring progress through the day, and updating the users via the phpBB boards and the “Site Closed” message, the posts finally finished importing at about 21:30. The importer then runs through a cache update for users and threads.
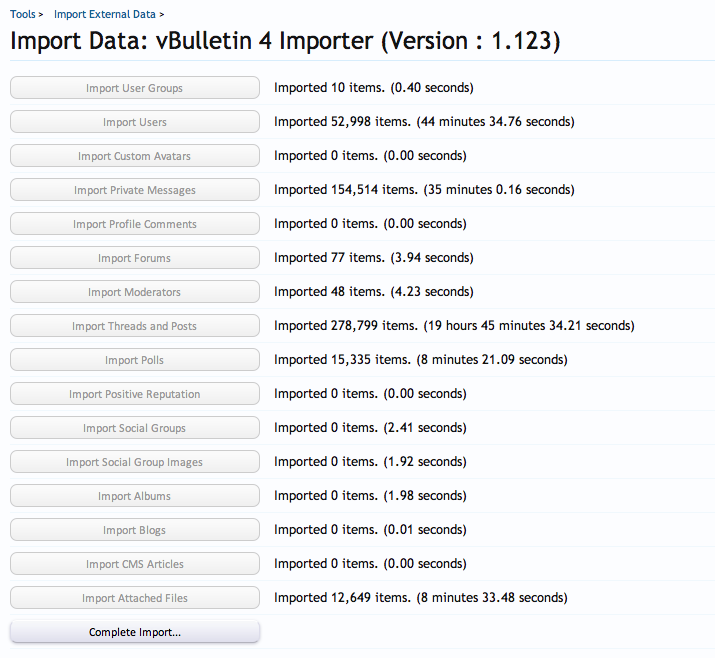
A dash through configuring Friendly URLs, moving the Sphinx config to index the xenForo boards instead of the vBulletin ones, checking basic user permissions and configuring a few more add-ons took me until 23:30 when we finally re-opened the boards.

So 23.5 hours start to finish for 10.3 million posts and I understand that we’re now the largest UK site running xenForo.

Aftermath

It took me a little while afterwards to get the vB4 Redirection working properly, and we’ve had a slow-query issue with another add-on which the author is hoping to fix. My thanks to Kier for helping track down where that query was coming from despite my still-frazzled support request.

The users seem generally pleased with the results, though there are a number of complaints about relatively minor pieces of functionality missing, dislike of change, dislike of the colours along with some genuine issues with useful functions missing that were previously available. Some of these are already addressed in xenForo 1.1, other might be later, and some may never get fixed.

From a tech admin point of view, xenForo is much lighter on the hardware, we’ve hit more than 800 users online already which is close to the highest we ever had under vBulletin and the only issue has been with the add-on I mentioned earlier.

My thanks to all the folks at xenForo for coming up with what has to be the neatest bit of forum software around. Also thanks to the authors of all the add-ons we’re using, and to all the xenForo community members for sharing their experiences and supporting such a great product.

It’s been a long journey, but we’ve reached our first xenForo milestone. May there be many more in the future!

Board Stats as of 8/8/2011

Discussions: 278,346
Messages: 10,346,335
Members: 40,492

Test System

CPU: One core of 2.133GHz Xeon X3210
RAM: 1.5GB
OS: Ubuntu Linux 10.10 virtual machine running on vSphere 4.1 host
Disks: Virtual disk stored on 3ware-controlled RAID1 pair of 250GB SATA drives

Live System
CPU: Intel Quad Core Q9300 @ 2.50GHz
RAM: 4GB
OS: FreeBSD 7.2
Disks: Adaptec-controlled RAID1 pair of 150GB WD Raptor SATA drives
vSphere PowerCLI: Moved your ISO datastore ? Reconnecting your CD-ROM drives

We recently moved our ISO store from a legacy NFS server to our main NFS filer.

The first task was copying the actual files, which can be done via any machine that has both datastores mounted (with read-write access to the destination store).

The more significant job is reconfiguring the VMs to use the copies of the ISOs in the new datastore.

Here’s the PowerCLI script I used:

  1. #
  2. # Disconnect all CD/DVD ISOs on a particular datastore and reconnect them to the new datastore
  3. #
  4. $myvcenter = "myvcenter.host.net"
  5. $mydatacenter = "BigDC1"
  6. $originalISOstore = "MyFirstISOstore"
  7. $finalISOstore = "MuchBetterISOstore"
  8.  
  9. Connect-VIServer $myvcenter
  10.  
  11. (Get-VM -Location: (Get-Datacenter $mydatacenter)) | ForEach ( $_ ) 
  12. 	{ 
  13. 	$myDrive = Get-CDDrive $_
  14. 	if ($myDrive.IsoPath -match "\["+$originalISOstore+"\]") 
  15. 		{
  16. 		Set-CDDrive -CD $myDrive -IsoPath ($myDrive.IsoPath -replace $originalISOstore, $finalISOstore) -Confirm:$false  
  17. 		} 
  18. 	}
  19. Disconnect-VIServer $myvcenter -confirm:$false

It’s fairly self-explanatory.

The biggest caveat with this is that it assumes that the source and destination stores have the same structure, but it wouldn’t be difficult to amend it to change the destination path slightly.